
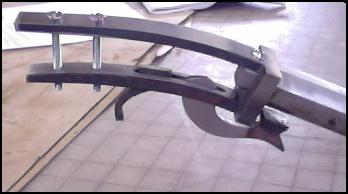
Keith didn't provide any information regarding his project other than to say that the photos will suffice to tell the whole story. I guess he’s right, because enough info can be deduced and gleaned from the photos of his action that anyone who does have some basic shop skills and mechanical aptitude will be able to build the action. If you have major questions after reviewing his photos, then perhaps you're not yet ready to build your own action and rifle from scratch.
Like most things in life if you wish to be successful in this endeavor you've got to have a plan. Don't just jump in and start making and fitting parts in Rube Goldberg hit or miss manner. If you don't have a set of plans for an action you wish to build, be sure you draw out your underhammer imaginings into a full scale drawing to be sure that it has a good chance of actually working.

For any of you who are contemplating a design and build, I would like to remind you that safety needs to be of paramount concern when laying out your hammer and trigger. Some builders may consider that they will be shooting their completed smoke pole only at the range under controlled conditions and really don’t see a need for a half-cock notch. Let me assure you that Murphy (of Murphy’s Law infamy) camps out at shooting ranges, too. There is no escape from the mischief that can occur with a rifle sans safety notch. Eventually it will get you - or worse, someone close by. It’s a numbers game and just a matter of time before your number is up.

It’s one thing to acquire an old underhammer that originally did not have a safety notch. It’s quite another thing, however, to deliberately design an unsafe action without it. It’s a fool’s dance and I would hope that anyone contemplating such stupidity would resist the temptation to skip the half-cock notch in your design.
I don’t mean to get preachy, but if you don’t have a basic concern for safety and a healthy sense of self preservation, at least consider others around you. If that doesn’t convince you, perhaps you should find another avocation besides shooting.
To quote my good friend, Terry from down under, “Stupid should hurt.” Hopefully, just the perpetrator and not an innocent bystander. If innocents are injured, the legal consequences and mental anguish could make you wish that you had died in the mishap. Making firearms is serious business and it needs to be treated as such.
Now back to the story…

Keith's design is so basic that the materials needed for the action could be acquired at a home improvement or hardware store. Mild steel will suffice for all the action parts. The hammer’s notches, the trigger’s sear, screw heads and pivot pins can all be spot hardened with Casenit heat treating compound for durability. But other than that, there should be no heat treatment needed for the rest of the action parts. It really can be quite simple to build.
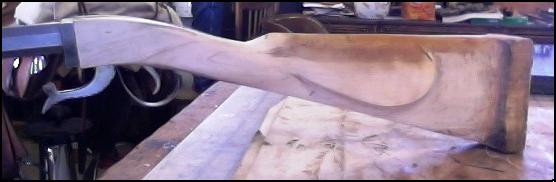
Clicking on the photos will enlarge them for a slightly better view of the details.
Clicking the Back button will return you to the text.
If you've gotten to this point and think that you would like to try your hand at underhammer gun building, may I remind you of the wonderful little book that I reviewed in an earlier post, The Underhammer Rifle, techniques and illustrations for the construction of Underhammer Locks by Jeff Baron. It's listed by Track of the Wolf as Item: BOOK - UR and may be purchased from their site at: www.trackofthewolf.com.
However, my recommendation of this book comes with a caveat. Some of the underhammer actions listed do not feature a half-cock notch and are not safe to be made and used as depicted. They will need a bit more thoughtful engineering to incorporate a half-cock notch into the lockworks to make them safe for use.
If you've got an underhammer that does not have a safety notch and you would like to shoot it, there is hope. I have earlier posted an article, Underhammer Safety - Low tech to the Rescue, about underhammer safety that will provide a simple yet safe way to take your underhammer afield. At the bottom right of this page is the Older Posts link. Just click on it and go back to through the pages to the earlier article. I'm sure you will be pleased with the simplicity of the solution.
So, go forth neophyte gun builders - be inspired by Keith's project and build.
But, please think and be safe.
Cheers!
Photos copyrighted by Keith Duncan
.


4 comments:
Dear Mr. Renner,
I have been a follower of your blog since you started it. You have been encouraging your readers to build their own underhammer rifles with an emphasis on including a safety notch if the original design did not have one.
I have been fiddling with an underhammer design of my own and I think it will work pretty well. But, I can't figure out the hammer and trigger positions and how to include a half-cock notch that works properly.
I remember when you had the underhammer guild website there was a drawing on it of the proper hammer and trigger positions that you recommended. I wish I had copied the picture but I didn't. Can you e-mail that picture to me or show it on the blog so I can study it before I waste more time making another hammer? I've made 4 already that don't work right.
Thanks for a great blog.
You have my e-mail address if you want to send the picture, but just sign me as anonymous.
Hello Anonymous. Yes, I remember the graphic you mentioned. The hammer/trigger geometry is so important to safe functioning that I'll try to round it up and post it again for everyone. Chances are good that if you asked about it, there are others who are wondering but don't have the gumption to ask.
Give me a few days to get to it.
Cheers!
Hello, have been following your blog for some time, with great interest.
I am finishing up an underhammer rifle based on the Cook design from the Baron book.
Been tinkering with it for about a month and of course the trigger spring part is the most difficult part to get right.
Just added a half cock position as you recommend.
If you'd like I could send pictures, but I don't see a provision for that at this place.
Thanks,
Bill Larson
Hello Bill,
Thanks for your feedback. One of the wonderful things about the Cooper is that it's one of the few exceptions to the half-cock notch rule - when built true to the original design.
If you would like to share photos, please e-mail me at: underhammers@safe-mail.net and we can go from there.
Cheers!
Roger
Post a Comment